

I do declare!
Spring has finally arrived!
And I ain’t just talkin’ about the kit either. Beeeaautiful day here in the land of “Sprinter”. ;) Suppose to even get up to 70 for the weekend. Of course, it is the “warm before the storm” as it drops to a whoppin’ 47 on Sunday. Ugh. Typical. Oh well, I’ll enjoy it while it’s here!
Okay, enough about the weather . . . here’s the This & That: Spring kit!


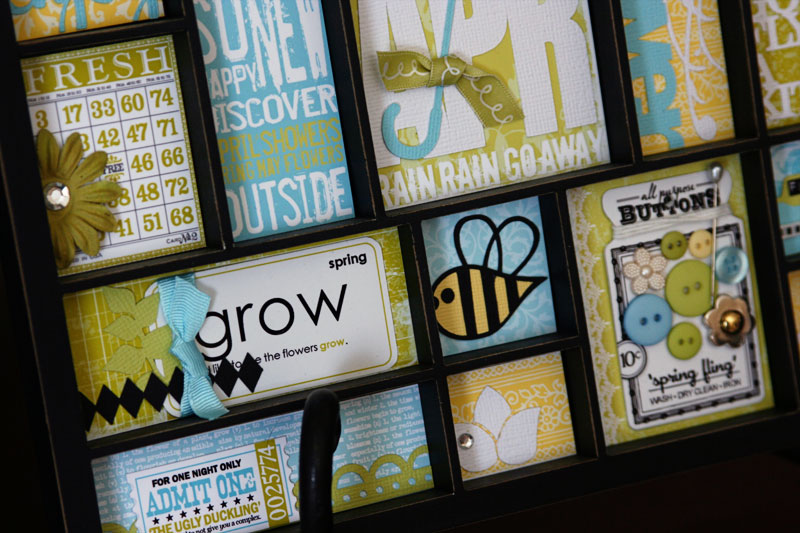

Here are a few tips about the kit.
First, I never have much of a reason to go buy anything after being in this business for so many years. So when I wanted to buy some monochromatic Bazill, imagine my disbelief in seeing first hand that the stores don’t carry that beautiful rainbow of ultra delicious colors otherwise known as Bazzill.
WHAT IS THIS WORLD COMING TO????
I can’t tell you how disappointed I was.
So just FYI, the two greens I used to match the kit . . . the lighter one is from American Crafts (wish I could remember the color name) and the other was from Echo Park called Juneberry/Grass. It’s purple on one side and green on the other.
Okay, onto the squares . . .
Peas.
There are three layers to the peas: the front and back of the pea pod, which are cut in the darker green and the peas themselves, which are cut in the lighter green.
GROW.
Tie a ribbon to the top of a paperclip and attach to the receipt.
Tree/Bench.
Adhere the trunk of the tree and leave the branch free so that you can tuck a couple of the leaves under the branch to give it some added dimension.
Dragonfly.
It’s funny how things come about. I’d planned on adhering this flat, however, when I went to pull it from the white cardstock sheet that I’d cut and sat aside, the wings had bent at the body. I thought, “Hmm. Let’s pop dot them up.” So there ya go, add a couple little pop dots to the inner part of the wing and adhere the body to the background.
BINGO card.
My intent was to use an aqua-ish flower, but I didn’t have one, so I used a green flower instead.
Umbrella.
Adhere the blue outline to the solid white background umbrella. Adhere the colored pieces inside the outline. As long as your keep your lines pretty straight, it fits like a puzzle. Tie a ribbon in a knot, trim the ends and adhere to the umbrella.
Bloom.
Adhere your flower first so that you know where to start with your “bloom” title. Start with the “M” and work backwards. I kind of wanted the flower to slightly overlap the “M”. Staple a couple of the letters.
Kite.
Assemble the four colored pieces of the kite using the solid white kite as a background. Adhere the white “dowel” piece. Tie a knot in the end of a string and adhere it to the center of the “dowel”. (I used a piece of a glue dot.) When you adhere the kite bows, that will secure the rest of the string.
Grow.
I preferred to adhere the leaf and diamonds to the “Grow” flashcard before adhering to background so that I could wrap a ribbon around just the “Grow” card. To do this:
- Add a tiny bit of adhesive along the right tips of the leaves (if you’re looking at the backside, it will be on your left though).
- Place along the left edge of the Grow card.
- Add adhesive to the last four diamonds and place on card.
- Wrap ribbon around card and tie in a knot.
- Adhere to background. The left edge of the diamonds should align with the left edge of your background.
Use a 1/8″ hole punch to punch a hole at the top in the designated spot.
All preorders will go out this evening. The “break it down” will be up tomorrow.
P.S. The colors are a little off in the photos, particularly with the darker green–and even more so, on the flowers. It’s not really as dark as it is showing.
Oh MY! Just when I think you can't come up with something cuter, you go ahead and prove me wrong! Love it, Kerri! I'm off to order!
Thanks Cari! :)
You are my HERO-INE! This is SO cute!!
Love, love, love this! This month seems even more intricate, and it's adorable. Getting these is a highlight of the month. :-)
Woosh! into my cart this goes! Thanks again for another adorable kit – LOVE these this and thats!
I think this is my favorite so far. How you do that? Bam!! Awesome. Can't wait! Thanks!
I love love this kit. You are the best. I only wish I were half as creative as you. Thank You!
Just, just adorable. Of course I have to have it, off to order. :)
Thank you all for your sweet comments.
Glad you like the kit! :)
Oh I love it Kerri!! Thanks for another great tray kit. You're so on top of it with the button card and all —
this just looks so cute
[…] used the bike shape from the This & That Spring […]
So stinking cute! Kerri, you are absolutely amazing. Seriously.
You are too sweet Miss Cori!
Did you ever get your Silhouette? :)